16 August 2016 —
Let’s Encrypt is the latest internet trending. Its a relatively young Certification Authority which intends to provide free and automated SSL certificates so that everybody can set encryption to their sites and applications.
It is a Linux Foundation project sponsored by most of the biggest Internet companies, such as Google, Facebook, Mozilla or Cisco.
They provide tools to automatically generate, setup and renew SSL certificates, but those tools are still in early stages, and not all the integrations are easy.
In this article I’m going to explain how to setup one of this certificates in an Amazon Web Services Elastic Load Balancer (ELB from now on).
Generate the certificate
There are very good tutorials out there on how to generate a certificate, so I’m not going to dedicate much to this.
I usually follow the instructions from certbot.
In there, you have to choose the web server of your choice, in this case “None of the above”, and your operating system, for example Ubuntu 16.04 (the only difference with older Ubuntu versions is that you can install the CLI tool from the standard repositories, otherwise there is a previous step where you have to download the certbot-auto script and run it, but that’s it).
Once you have installed the letsencrypt tool (or certbot-auto), you have to generate the certificate with the webroot plugin. This plugin just generates the certificate by providing the document root for each domain that will be included in the certificate.
letsencrypt certonly --webroot -w /var/www/mydomain -d mydomain.com -d www.mydomain.com -w /var/www/cool-site -d cool-site.com -d www.cool-site.com
This will create a certificate valid for mydomain.com, www.mydomain.com, cool-site.com and www.cool-site.com.
All of the domains get verified from let’s encrypt side by putting a temporary hidden file inside provided web root folders.
In this case, the first two domains will be checked in the /var/www/mydomain folder, and the last two in /var/www/cool-site. If those domains are really served from there, the certificate will get properly created.
The problem with this in an Elastic Load Balancer is that you are running this tool in one server, but you will have more than one balanced server. This could make the previous process fail if the wrong server responds to the let’s encrypt check request.
To prevent this you will have to leave just one server temporarily. Don’t worry, it only takes a few seconds. Once the certificate is created you can add the rest of the servers again.
There are other plugins which simplify deploying certificates in standalone web servers.
For example, the apache plugin automatically sets the configuration in the apache virtual host of your choice.
If everything worked, you should now have 4 files in the /etc/letsencrypt/live/mydomain.com folder.
/etc/letsencrypt/live/mydomain.com
  |-- cert.pem
  |-- chain.pem
  |-- fullchain.pem
  |-- privkey.pem
Setup the certificate in an ELB
Now that you have your certificate files, you need to upload them to the ELB.
Go to the AWS web console, select the EC2 service and go to Load Balancers. Once there select the load balancer of your choice and go to the Listeners tab.
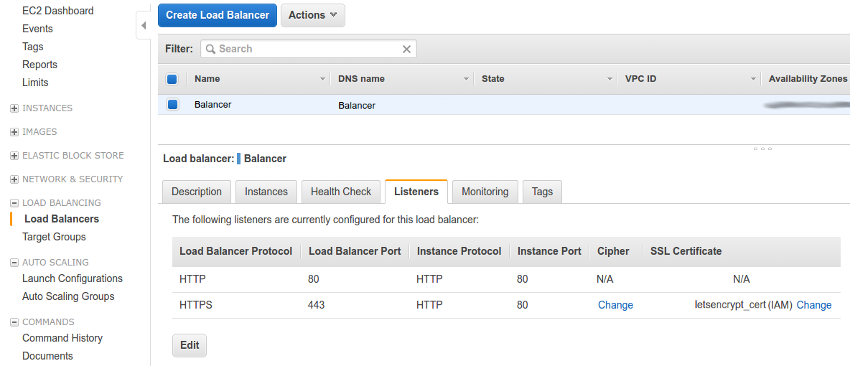
Now you have to click on the “Change” link, in the SSL Certificate column of the HTTPS protocol, in order to set the new certificate.
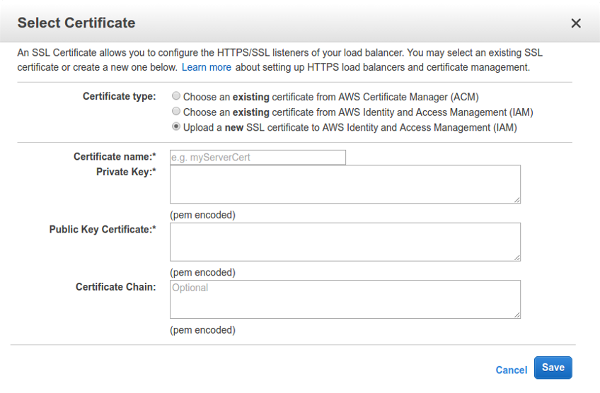
In this window, select the third option, Upload a new SSL certificate to AWS… and set the name of your choice for it.
Then, in the Private key field you have to place the contents of the cert.pem file, and in the Public key certificate field, the contents of the fullchain.pem file. You can leave the Certificate chain field empty.
Save, and you are done. Your ELB is now serving HTTPS request by using the previously generated Let’s Encrypt certificate.
Renewal
Renewing this certificate is easy. Just run the command letsencrypt renew (or certbot-auto renew) in the same server used to create the certificate in the first place.
That will generate the new certificate in the same location, and you can repeat the previous step with it.
The main problem with Let’s Encrypt certificates is that they are valid for three months only. Auto renewal is a feature that they want to implement at some point, but it’s not available yet.
By the moment, the best solution for standalone servers is creating a cron job that automatically runs the letsencrypt renew command, but for an ELB that won’t fix the problem.
You will probably need to create some kind of script that automatically uploads the certificate to the ELB after being renewed, by using the AWS REST API or the CLI interface.
This documentation should be helpful. Pay special attention to the To replace an SSL certificate with a certificate uploaded to IAM section.